Monday, August 17, 2015

Red paint...not bleeding...


Today I started and completed a chest of drawers for one of my clients...this was many "firsts" for me.  This client, Jennifer, was my first ever paying client - probably about two years ago.  I didn't even know what to charge!  So, she is now my first repeat client.  Also, this was the first red piece I did.  I knew that the red would be pretty - but I was pleasantly surprised at just how pretty it would be!

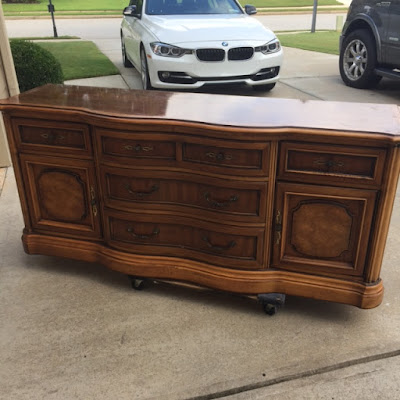
The piece started out looking like this...


This, I believe, was one of her mother's pieces of furniture.  Jennifer's mother passed away from breast cancer not too long ago - so I know this piece means a lot to her and her family.  And I wanted to make it pretty for her so she can continue to use it and love it even more.  Honestly, this was the whole drive behind this business as I started redoing my late Gramma's furniture in order to use it and it just went from there.  So, it is important to me and I take it very seriously when there is so much meaning behind a piece of furniture.

When Jennifer and her husband (and her sweet babies - again one is RED HEADED...it's a sign for sure!)  dropped off these pieces I asked her what she wanted.  Her being pregnant and it being 98 degrees that day...she said "I don't care...just make it look good."  Got it...I can handle that.  So, I knew the room it was going in had primary colors bc I did another dresser for this room 2 years ago.  I proposed red and her husband said "Red is her favorite color" Which I thought was so sweet and Jenn...he should earn brownie points for that!

So, she gave me the go ahead for the red paint, which I was thrilled about!

This was a pretty simple piece...very straight lines.  So I started with two base coats of Annie Sloan's Emperor's Silk paint which you see in the picture below and also the second picture is with two coats applied.  


Once the two coats were dry (which took a little longer to dry due to the high humidity today in North East Georgia) I sanded the whole piece to give it a distressed look as picture below....


If you notice - once you sand it the paint turned a pinky orange color....don't worry the wax will bring it back!  This sanding is done by hand with a sanding block.

Once the piece was distressed I used Annie Sloan's dark wax on the entire piece.  You can see in the pictures below - 1. I "painted" the wax on and 2. Then I wiped it look with a rag.  When they say wax on/wax off...they mean it.  See the pictures below of brushing on and wiping off...


You have to get a little bit of elbow grease on there to make sure you get all the extra off.  Now, you will have extra wax left in the grooves and corners - you want that...so leave it! You can see in the picture below the half that is dark waxed and the half that is not.


Last, I used silver gilders paste to recolor the hardware.  The silver turned out great - it looks white in the picture - but it is silver in real life.


Let me just tell you the funny moment of the day - because you know I have to tell a funny story with each piece.  So, this paint is red right?  Well, as you paint and move around a piece - you get paint on you.  It is inevitable.  Well, I thought I had washed all the paint off my skin.  Apparently, somehow I got a massive line of red paint on the back of my ear.  I WISH you guys could've seen Tim (my husband) freaking out because he thought I was bleeding profusely from my head.  Still makes me chuckle thinking about his face and how much he went into panic mode. :)

Tomorrow, I start a crib for this same client (remember #3 is on the way).  I have never done a crib so I am looking forward to this very much!

I think all the red paint is off my body...hopefully...

Julie

Sunday, August 16, 2015

Mirror, mirror....

Delivered this beauty today!  I posted about the bottom part of this piece earlier in the week.  I wanted to just wrap up about this piece.  

First, I am SO glad we decided to go with the stained top of the buffet.  With the hutch on top, it just adds so much to the piece.  

There was not much I did differently than what I did to the buffet.  I did have to tape a pretty good amount on the hutch due to all the glass and mirrors.

Speaking of mirrors...to paint the inside of the hutch I ended up laying it on its back like this...


Well....The entire backing of the hutch is mirrors.  So in this position, those mirrors were pointing straight up to the sky.  Being as low as it is to the ground, I was bent over the entire time painting the inside...which meant I stared at myself, in a not so attractive angle, for two days...each time I looked down in the mirror or  catch a glimpse it was like I had just opened up the camera on my phone and it was pointed towards me...WHOA!...I know everyone knows what I am talking about...


But, seriously...not cute.  :)

My client was very happy with her piece.  It was great to see her today and I got to meet her sweet babies (one is a fellow red head - so of course I felt bonded to him already) :)

My client went to work immediately putting her china in the hutch...check out it all filled up...


Tomorrow I will be starting on a dresser for my first ever "real" client and now she's my first repeat!  :)  The dresser is going to be RED - I am overly excited about this since I have never had the chance to do red!  

Currently covering all mirrors in my home,

Julie


Wednesday, August 12, 2015

Let me tell you about white paint...

If you follow me on any social media you know the buffet I have been working on.  This piece came from a girl I went to high school with and now stay in touch with through Facebook (I love Facebook for this reason!)  On a side note - this new adventure I have taken on has brought me back in touch with so many people from my high school days - I just love it!  I get to meet their children and spouses...it just really is awesome!  Anyway...back to furniture....


I got the above buffet and hutch from my client - probably the heaviest pieces I have ever gotten.  It was quite humorous I'm sure watching Tim and me get these pieces off his truck.  I literally was in a squatted position side stepping with this piece resting on my legs.  My crossfit training really came in handy at this point!  We will be asking for help to get it back on the truck (don't worry, Renee - we had it under control the whole time) :)

Needless to say, this was a very well built nice piece of furniture.  My client wanted a off white look for the top and bottom.  After getting the piece I thought it would be good to have the top of the buffet stained to breakup all the white from the buffet and hutch.  My client agreed and I went to work!

This piece sanded so nicely!  Let me tell you how nerve racking it is to have someone else's furniture in your hands...if I mess up a piece that I am going to resell in my booth - no big deal...someone else's great grandma's furniture that has been in the family for 100 years - SCARY!!  But, this piece, I knew was going to do great the moment I started sanding.  If you can see in the picture below how great the top became - a complete blank slate - CLEAN!  When I see this happen it literally makes my day!


Once the top was sanded I went ahead and stained the top.  I used a new color with this piece.  It is called Ash by Varathane.  It is a brown stain and picks up some darker tones in the grain.  I thought it would look perfect with the Old White paint by Annie Sloan.   Check out the picture of the top half stained and half clean...just to see the difference.


After the staining was done I went to work on the Old White Annie Sloan paint.  Now, let me tell you something about white paint....it take A LOT of coats.  White furniture with a stained top is VERY popular and I agree looks AMAZING!  But, you have to be very very careful with it.  You see lots of brush strokes with it and it can dirty easily (I just wrapped the buffet in industrial plastic wrap before sitting down to write).  And, Renee...you have small kids...I will leave some touch up paint with you :)

I literally painted the entire piece - hardware and all.  Because I now use the Gilder's paste for my hardware a good base for the paste is chalk paint.  So, I just painted.  Plus, the plates on the door pulls do not come off this piece - so it worked out!

If you see in the below picture - this was with one coat of Old White...


This piece took three coats - and for a full on thick covered look a 4th would've been required but I wasn't going for that look so I stuck with 3.  

Once the base had three coats on it I used the Gilder's paste on the hardware.  I used a new color - German Silver.  It is a bronzed/gold/ metallic color that I thought would go great with the stained top.  Again, with the gilder's paste - you just apply with your finger.  It goes on so smoothly!

You can see the hardware redone below - I just LOVE this stuff!


Once all of the hardware was pasted I distressed very minimally just to give depth and then clear waxed the piece.  


I have already started taping off the hutch.  I can't wait to see the hutch on the buffet - too bad I will have to wait until we get it to my client's home because I am not sure I can physically lift the hutch up that high to get it on the buffet.  

I will share the hutch info soon!

Sometimes furniture kicks my butt,

Julie


Sunday, August 9, 2015

How to: Tables and staining particle board

I finished up that three piece dining set and I wanted to share some thoughts with you about the table.  As I mentioned in the post about the buffet - the tops were sandable/stainable wood - the edges or trim of the top was not.  I ended up just painting the trim on the buffet but I wanted to stain the whole top of the table and of course when a challenge arises, I am up for solving it!

First, the best way to paint any sort of table or chair is to flip it over.


As you can see from the picture - it is a whole lot easier to get to the underneath and the bottom on the legs.  You won't miss any spots - trust me on this.  

So, you want to do the base of the table first because when you flip it you don't want your finished top to be on any sort of surface. 

Here is what the table looked like with the base painted and ready for the top to be completed.  This was done in French Linen by Annie Sloan - 2 coats.


First, I painted around the edge of the table - twice.  For a more finished clean piece 2 or 3 coats is a must!  Once the edging around the top of the table was painted - I went to town sanding.  


You can see the table half way sanded to see the difference - I only used the 120 grit sandpaper on this due to the thin piece of "real wood" that was on the top of the table.  I didn't want to get down in to the particle board.  Not sure if you can see the layer of dust on my face - but just trust me when I say I am NASTY when I am done sanding.  :)

If you look closely at the picture - you can see once I sanded it gave me a nearly perfect line from the top of the table to the lip or edging (the edging is painted French Linen).  

Once it was all sanded - I applied the Kona colored stain to the top.  I, as usual when I am in deep thought, was just staring at the table trying to figure out how I could make the lip match the stain.  So, knowing I may have to paint the lip again - and tape the whole thing off if I mess up, I applied the stain to the French Linen chalk paint.  Worked like a champ!  The chalk paint absorbed the stain and because chalk paint leaves a "brushy" type texture...it looks like wood grain!  

Let me just say - I am REALLY glad it worked because I would've been upset with myself if I would've had to go back and tape around the lip and paint it again.

This is so good to know for future projects!  There are so many pieces I have to tell people we HAVE to paint because it is not sandable/stainable!  

I applied a clear coat of wax - and it's done!

Here is the final product:


My kids go back to school tomorrow,

Julie


Monday, August 3, 2015

Sanding woes and new hardware technique!


Remember this piece from last week?  I completed it today - and it turned out better than I expected!  I ran into a one issue with this piece.  While I was sanding the piece, I noticed that the edges around the top of the piece were not sanding well.  The top of the piece ended up being wood but the edging around the top is particle board.  So, I could not stain the entire top - just the flat surface.  Not a big deal - a lot of my pieces are done like that.


You can see in the picture above the difference in the side of the top and the flat part of the top.  


You can see in this picture the before top and the "naked" top as I call it.  It is a clean slate to do whatever you want with the piece.  I chose kona stain for this piece - I wanted it darker than the walnut to go with the dining room this piece will go in.  


Once the piece was sanded with 60 grit sandpaper for removal and then 120 grit sandpaper for finishing, I went ahead and stained the top.  Below is the final product for the top.


Next, I used French Linen by Annie Sloan for the base of the piece.  French Linen is close up there with the Duck Egg Blue by Annie Sloan.  Very popular - and goes with just about anything!


This piece needed 3 coats as we were going for a more clean look to this piece.  It is going in a formal dining room - so the clean look was better this time.  After the three coats of paint were on the piece I distressed it just on the edges - lightly and then gave it a coat of clear wax.  

Now, for the most exciting part of my day.  I used something new today!  Usually if I want to keep the hardware I just paint it.  Chalk it Up has this product that gives a more real metallic look to hardware.  IT IS AWESOME!  It is called Gilder's Paste by Baroque Art.  It looks like this...


The consistency reminds me of that eye shadow everyone had in early high school that you rubbed on your eyelids with your finger and it gave a ultra shimmery look (lady readers - don't act like you didn't have this - kinda looked like your eye lids were on fire!)  Anyway,  I applied it with my finger and it gave the hardware a brand new silver look to them!  I am in love and can't wait to use it again!  

Here is the completed piece displayed in my home (but not staying...upset about this). 


Tomorrow I will start the table and chairs to match this piece - can't wait to see it in it's home!

In need of a shower,

-Julie